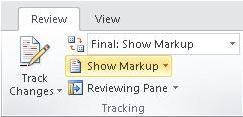
To View the Names of the Reviewers Use the Show Markup Command
Turning on Track Changes gives yous and your coworkers a fashion to make changes that are easy to spot. The changes are similar suggestions that you tin can review, and and then remove them or make them permanent.
Plough Track Changes on and off by going to Review > Track Changes.
-
When it's turned on, deletions are marked with a strikethrough, and additions are marked with an underline. Different authors' changes are indicated with different colors.
-
When it's turned off, Discussion stops mark changes, just the colored underlines and strikethrough are still in the document.
View suggested changes
To review the changes in your document, go to Review > Tracking > Brandish for Review.
-
To review the changes, indicated past a scarlet line in the margin, cull Elementary Markup.
-
For a detailed view of the changes, choose All Markup.
-
For a preview of how the document volition await if you lot make all the suggested changes permanent, choose No Markup.
-
To view the original document as if all the suggested changes were removed, cull Original.

Plough on Track Changes
-
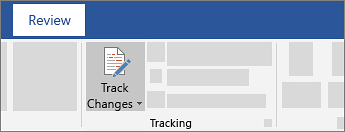
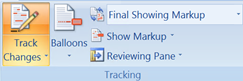
On the Review tab, in the Tracking grouping, choose Runway Changes.
The Track Changes is highlighted, as shown in the following paradigm.
Note: If the Track Changes feature is unavailable, you might have to plough off document protection. On the Review tab, in the Protect group, click Restrict Editing, and and then click Stop Protection at the bottom of the Protect Document task pane. (Y'all might need to know the document password.)
You as well can add a rail changes indicator to the status bar.
-
Right-click the status bar and choose Runway Changes.

Note: You now can employ the Track Changes indicator on the condition bar to plough on or turn off Track Changes.
Turn off Rails changes
When you lot turn off Track Changes, you tin revise the document without marking what has inverse. Turning off the feature, however, doesn't remove whatsoever changes that have already been tracked.
-
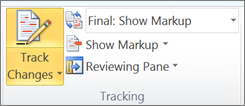
On the Review tab, in the Tracking group, choose Rails Changes button.
The Rails Changes push no longer is highlighted as shown in the following prototype.
Important: To remove tracked changes, use the Accept and Pass up commands on the Review tab in the Changes group.
Testify or hide comments or tracked changes
What would you like to do?
-
Display all changes inline
-
Display comments in ScreenTips instead of balloons
-
Display changes by type of edit or by reviewer
-
Brandish changes and comments for specific reviewers
-
Hide tracked changes and comments when printing
Display all changes inline
The default in Word is to display deletions and comments in balloons in the margins of the certificate. Withal, you lot tin modify the display to show comments inline and all deletions with strikethroughs instead of inside balloons.
-
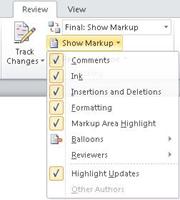
On the Review tab, in the Tracking group, click Show Markup.
-
Signal to Balloons, and so click Show All Revisions Inline to testify deletions with strikethroughs and comments inline.
Display comments in ScreenTips instead of balloons
The default in Word is to display deletions and comments in balloons in the margins of the document. However, you tin change the brandish to show comments inline. Inline comments can be viewed when yous rest your pointer on the comment indicator.
-
On the Review tab, in the Tracking group, click Testify Markup .
-
Point to Balloons, and and so click Show All Revisions Inline to evidence deletions with strikethroughs and comments inline.
-
Rest the arrow on a comment in the document. The comment appears in a ScreenTip.
Brandish changes by type of edit or past reviewer
-
On the Review tab, in the Tracking grouping, click Bear witness Markup .
-
Do one of the following:
-
Click to select the blazon of change that yous want to display.
For example, click Comments or Insertions and Deletions. The cheque mark next to the detail indicates that the detail is selected.
Important: Fifty-fifty if you hide a type of markup by clearing it on the Show Markup bill of fare, the markup automatically appears each time the document is opened past you lot or a reviewer.
-
Point to Reviewers, then click to articulate all bank check boxes except the ones adjacent to the names of the reviewers whose changes and comments yous desire to show.
Note: To select or clear all check boxes for all reviewers in the list, click All Reviewers.
-
Display changes and comments for specific reviewers
An editor or reviewer ordinarily wants to view a document every bit it volition appear after their changes are incorporated. This procedure gives an editor or reviewer the opportunity to see how the document will await with the changes.
-
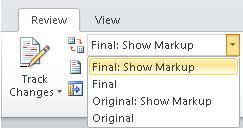
On the Review tab, in the Tracking group, click the arrow in the Display for Review box, and then choose the pick that you desire.
-
Final Showing Markup This view displays the last document with all tracked changes and comments showing. This is the default view for all documents opened in Word.
-
Final This view displays the certificate with all changes incorporated into the text and without tracked changes showing. Nonetheless, any tracked changes or comments that have non been accepted, rejected, or deleted remain in the certificate.
-
Original Showing Markup This view displays the original text with tracked changes and comments.
-
Original This view displays the original document without tracked changes and comments showing. Yet, any tracked changes or comments in the document that have not been accustomed, rejected, or deleted remain in the document.
-
Notation: If y'all want to see comments and tracked changes in balloons, you must be in Print Layout view or Web Layout view.
Hibernate tracked changes and comments when printing
Hiding changes does not remove changes from the document. Y'all must apply the Accept and Refuse commands in the Changes group to remove markup from your document.
-
Click the File tab.
-
Click Impress.
-
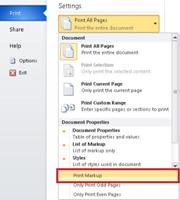
Nether Settings, click the arrow adjacent to Print All Pages.
-
Click Print Markup to clear the check mark.
Review, accept, reject, and hibernate tracked changes
What would yous like to do?
-
Review a summary of tracked changes
-
Review each tracked change and comment in sequence
-
Review changes by type of edit or past a specific reviewer
-
Accept all changes at the aforementioned time
-
Decline all changes at the same time
-
Delete comments
Review a summary of tracked changes
The Reviewing Pane is a handy tool for making certain that all tracked changes have been removed from your document and won't testify upwards to others who might view your certificate. The summary section at the meridian of the Reviewing Pane displays the exact number of visible tracked changes and comments that remain in your certificate.
The Reviewing Pane also allows you to read long comments that don't fit within a comment bubble.
Notation: The Reviewing Pane, unlike the document or the annotate bubbles, is non the best tool for making changes to your certificate. Instead of deleting text or comments or making other changes in the Reviewing Pane, make all editorial changes in the document. The changes will then exist visible in the Reviewing Pane.
-
On the Review tab, in the Tracking group, cull one of the following:
-
To view the summary at the side of your screen, cull Reviewing Pane.
-
To view the summary across the bottom of your screen, in the Reviewing Pane listing, choose Reviewing Pane Horizontal.
-
-
Choose Show Detailed Summary to view the number of each type of alter.

Review each tracked modify and comment in sequence
-
On the Review tab, in the Changes group, click Adjacent or Previous.
-
Do ane of the following:
-
In the Changes group, choose Take.
-
In the Changes group, cull Pass up.
-
In the Comments group, cull Delete.
-
-
Accept or decline changes and delete comments until there are no more tracked changes or comments in your document, and so confirm all tracked changes are accepted or rejected and that all comments are deleted.
-
On the Review tab, in the Tracking group, cull Reviewing Pane.
Note: The summary section at the top of the Reviewing Pane displays the exact number of tracked changes and comments that remain in your document.
Review changes by type of edit or by a specific reviewer
-
On the Review tab, in the Tracking group, do one of the following:
-
In the Evidence Markup list, clear all cheque boxes except for those side by side to the types of changes that you want to review.
-
In the Show Markup list, choose Reviewers, and then clear all cheque boxes except those side by side to the names of the reviewers whose changes you desire to see.
-
In the Show Markup list, choose All Reviewers to select or clear the check boxes for all reviewers in the list
-
-
On the Review tab, in the Changes grouping, choose Next or Previous.
-
Do one of the following:
-
In the Changes group, choose Accept.
-
In the Changes grouping, choose Pass up.
-
Accept all changes at the same time
-
On the Review tab, in the Changes group, cull Next or Previous.
-
In the Accept list, cull Accept All Changes in Document.
Reject all changes at the same time
-
On the Review tab, in the Changes group, choose Next or Previous.
-
In the Reject listing, choose Reject All Changes in Document.
Delete comments
-
Click the comment.
-
On the Review tab, in the Comments group, click Delete.
To delete all comments at once, click the pointer below Delete, and then click Delete All Comments in Document.
What would you like to practice?
Plough Track changes on or off
You can easily make and view tracked changes and comments while you work in a certificate. By default, Microsoft Office Word 2007 uses balloons to display deletions, comments, formatting changes, and content that has moved. If y'all want to meet all your changes inline, you can alter settings and then that tracked changes and comments display the way y'all desire.
Balloons (1) show formatting changes, comments, and deletions.
Note: To prevent yous from inadvertently distributing documents that comprise tracked changes and comments, Word displays tracked changes and comments by default. Final Showing Markup is the default selection in the Display for Review box.
-
Open the certificate that you want to revise.
-
On the Review tab, in the Tracking group, click the Rails Changes push. The Track changes button becomes highlighted, equally shown in the following figure.
-
Optional. Add a track changes indicator to the status bar. Right-click the status bar, and click Rails Changes. Click the Track Changes indicator on the status bar to turn on or turn off track changes.

-
Make the changes that you lot want by inserting, deleting, moving, or formatting text or graphics. You can likewise add together comments.
Note: If you use change tracking and so save your document every bit a Web page (.htm or .html), tracked changes will announced on your Spider web page.
To turn Track changes off:
-
On the Review tab, in the Tracking group, click the Rails Changes button.
The Track Changes button is no longer highlighted, as shown in the post-obit image.
If you customized the condition bar to include a track changes indicator, clicking Rail Changes in the Tracking group will also plow off the indicator in the status bar.
Annotation: Turning off change tracking does non eliminate the tracked changes in your document. To ensure that there are no more tracked changes in your document, be sure that all changes are showing, and then employ the Take or Reject commands for each alter in the document.
Be aware that at that place are various ways to hide tracked changes or comments, but all the changes that were fabricated while the Rails Changes feature was turned on and all the comments that were inserted remain function of the document until they are accepted or rejected (or, in the case of comments, deleted).
Hiding tracked changes—for case, nether Show Markup, immigration the check mark for Insertions and Deletions—doesn't delete existing tracked changes or comments from the document. Instead, hiding tracked changes enables you to view the document without having to wade through crossed-out text, underlining, and balloons.
Find hidden changes and comments
There are several ways to hide tracked changes and comments, which may atomic number 82 y'all to think that they are non in the document. For instance:
-
Display for Review box On the Review tab, in the Tracking group, the Brandish for Review box shows y'all what viewing mode you are in. It also provides boosted options for viewing your document. If you click Final or Original, tracked changes and comments are hidden. To brandish them, select Concluding Showing Markup or Original Showing Markup.
-
Show Markup On the Review tab, in the Tracking group, you can employ the Show Markup list to hibernate comments and tracked changes. Items that are marked with a check marking under Show Markup are displayed; items without a check marking are hidden. To brandish an item, such as Insertions and Deletions, click it on the Show Markup menu.
Show all changes (revisions) in document
The default in Discussion is to display deletions and comments in balloons in the margins of the document. However, y'all can change the display to prove comments inline and all deletions as crossed out instead of inside balloons.
-
On the Review tab, in the Tracking group, click Balloons.
-
Click Testify All Revisions Inline to show deletions as crossed out and comments inline.
There are several options bachelor for irresolute how tracked changes (markup) is displayed.
-
You tin change the colour and other formatting that Word uses to mark changed text and graphics past clicking the arrow next to Track Changes and then clicking Change Tracking Options.
Note: While yous can't assign specific colors for changes made by dissimilar reviewers, each reviewer's changes appear as a dissimilar colour in the document so that you tin can track multiple reviewers.
-
You tin view all changes, including deletions, inline instead of within balloons that announced in the margins of your document. To show changes inline, in the Tracking grouping, click Balloons, and then click Show all revisions inline.
When you click Show all revisions inline, all the revisions and comments in the certificate appear inline.
-
To highlight the margin area where all balloons appear, nether Prove Markup, click Markup Area Highlight.
Show changes (revisions) by type of edit or by reviewer
-
On the Review tab, in the Tracking group, click the pointer side by side to Show Markup.
-
Practice one of the post-obit:
-
Select the blazon of change that you desire to brandish.
Note: Even if you hide a type of markup past immigration it on the Show Markup menu, the markup automatically appears each time the certificate is opened by you or a reviewer.
-
Indicate to Reviewers, and then click to articulate all check boxes except the ones adjacent to the names of the reviewers whose changes and comments y'all want to show.
Note: To select or clear all cheque boxes for all reviewers in the listing, click All Reviewers.
-
Evidence changes and comments for specific reviewers
You can use the Display for Review list, in the Tracking group, to view a document at various stages of the edit process. Each of the 4 options in the list provides a different view of the certificate. Terminal Showing Markup is the default when you open whatsoever certificate.
-
Concluding Showing Markup This view displays the final document with all tracked changes and comments showing. This is the default view for all documents opened in Discussion.
-
Final This view displays the document with all changes incorporated into the text and without tracked changes showing. Nonetheless, any tracked changes or comments that have not been accustomed, rejected, or deleted remain in the certificate.
-
Original Showing Markup This view displays the original text with tracked changes and comments.
-
Original This view displays the original document without tracked changes and comments showing. Nevertheless, any tracked changes or comments in the document that have non been accepted, rejected, or deleted remain in the document.
View comments in document
The default in Give-and-take is to brandish deletions and comments in balloons in the margins of the certificate. However, you can modify the display to show comments inline. Inline comments tin be viewed when yous rest your pointer on the comment indicator.
-
On the Review tab, in the Tracking grouping, click Balloons.
-
Click Prove All Revisions Inline to bear witness deletions as crossed out and comments inline.
-
Rest the pointer on a comment in the document. The comment appears in a ScreenTip.
To larn more about comments, see Insert and delete comments.
Review each tracked change and annotate in sequence
-
On the Review tab, in the Changes group, click Side by side or Previous.
-
Exercise one of the following:
-
In the Changes grouping, choose Accept.
-
In the Changes group, choose Reject.
-
In the Comments group, choose Delete.
-
-
Take or reject changes and delete comments until at that place are no more tracked changes or comments in your document, and then ostend all tracked changes are accustomed or rejected and that all comments are deleted.
-
On the Review tab, in the Tracking group, cull Reviewing Pane.
Note: The summary section at the height of the Reviewing Pane displays the verbal number of tracked changes and comments that remain in your document.
Take or reject all changes at the same fourth dimension
-
On the Review tab, in the Changes grouping, choose Adjacent or Previous.
-
Do 1 of the post-obit:
In the Have listing, choose Accept All Changes in Certificate.
In the Refuse listing, choose Turn down All Changes in Document.
Inspect a document for tracked changes and comments
Office Word 2007 provides a feature called Document Inspector that allows you to check whatever document for tracked changes, comments, hidden text, and other personal information. To check a document:
-
Open the document you desire to inspect for tracked changes and comments.
-
Click the Microsoft Function Push
 , signal to Prepare, and then click Inspect Document.
 -
In the Document Inspector dialog box, click Inspect.
-
Review the inspection results. If Certificate Inspector finds comments and tracked changes, you are prompted to click Remove All next to Comments, Revisions, Versions, and Annotations.
-
Click Reinspect or Close.
Evidence tracked changes and comments when press
Before y'all print the document, switch to Print Layout view and display the tracked changes and comments the way that you want them to appear in the printed certificate. Yous take several options.
-
Print showing all markup On the Review tab, in the Tracking grouping, click Show Markup.
Annotation: Clicking Show Markup displays or hides all markup in the document for selected reviewers. When you display all markup, all types of markup are selected on the Prove Markup menu.
-
Print showing changes and comments by type or reviewer On the Review tab, in the Tracking group, click Testify Markup, and then select the type of modify that you lot desire to display.
-
Print changes and comments for an editor or other reviewer On the Review tab, in the Tracking group, in the Display for Review box, click Final Showing Markup.
When the markup appears the mode that you desire it to, you are set up to print the document.
-
Click the Microsoft Office Push
, and then click Print. -
In the Impress dialog box, in the Impress what box, click Document showing markup, and then click OK.
Notes:
-
By default, Microsoft Word chooses the zoom level and folio orientation to best display the tracked changes in your printed certificate.
-
If balloons are turned on, the document will compress to fit the balloons on the printed page. To make your printed folio readable, you can turn off balloons past clicking Balloons in the Tracking group and and then clicking Evidence all revisions inline. Y'all can also set the page layout to mural to print the balloons and the text in a more readable format. On the Page Layout tab, under Page Setup, click Orientation, and then click Landscape.
-
Change the layout for printing tracked changes
-
On the Review tab, in the Tracking group, click the arrow adjacent to Track Changes, and and so click Change Tracking Options.
-
Nether Balloons, in the Paper orientation in printing list, click 1 of the following:
-
Motorcar When you lot select this option, Word decides the orientation that will provide the all-time layout for your document.
-
Preserve When you select this pick, Word prints the document with the orientation that is specified in the Page Setup dialog box.
-
Force Landscape When y'all select this option, the orientation is landscape and the nigh room is allowed for balloons.
-
Impress a list of changes made to a document
-
Click the Microsoft Part Push button
, and then click Impress. -
In the Print what box, click List of markup.
Hibernate tracked changes and comments when printing
Hiding changes does not remove changes from the document. You must utilize the Have and Reject commands in the Changes group to remove markup from your document.
-
Click the Microsoft Office Button
, and so click Print. -
In the Impress what box, click Document (instead of Document showing markup).
Run across likewise
Insert or delete a comment
Source: http://howtomicrosoftofficetutorials.blogspot.com/2018/10/
0 Response to "To View the Names of the Reviewers Use the Show Markup Command"
Post a Comment